Showing posts with label weekly quilt. Show all posts

Friday, February 08, 2013

New Weekly Quilts This Year Are For Sale

So I am back to making Weekly Quilts again this year, and I decided that they are for sale!  I have a hard time parting with my art.   I find that if I made it for intentionally trading or selling, I didn't have a problem with it finding a new home.  So this year, every weekly quilt I make will be for sale. 
© Cheryl Sleboda - Robot I - 2013
Ideally the goal will be to have them in themes so that if I want to offer them as a group to a gallery, they would go together and hang well.

If you are interested in what's left, head on over to my Etsy Shop and check them out!  

Thursday, December 22, 2011

Grüß vom Krampus!

Greetings from Krampus, the mythical creature that is one of jolly St. Nick's companions.  Far be it from me to exclude the guy who punishes the children who have been naughty!  If you weren't the best behaved this year, Krampus would not only lock you in his chains, but also beat you with his switches!  I'm sure that was the 1800's version of "Scared straight".  But needless to say, when I heard of the Krampus, I had to make him into one of my weekly quilts.  This theme set is "mythic monsters".

I hope you and your families have a wonderful Holiday season!

Thursday, September 22, 2011

About Weekly Quilts - Part 4 - Why work weekly

I'm continuing my "About Weekly Quilts" articles, this time discussing how working weekly keeps your mind active so you have fewer slumps.
*************************
The reason I started working weekly in the first place is to keep me in the studio working on something.  I had become a chronic "buyer".  I bought magazines for inspiration, but never made anything out of them.  I bought fabric that I loved so much I could not cut up.  I bought tools, but rarely used them. I needed a way to get myself motivated enough to stop buying and start using this stuff!
I also started it to keep my mind sharp.  My doodles from office meetings were piling up.  I had ideas, but lacked the desire to start another humongous project. I work full time, and travel quite a bit.  How could I possibly quilt and still work and have a home life? I needed something small, something executable in a short period of time, and I wanted to have fun.
Next thing I knew, every doodle became a small quilt.  A painting on a friends wall was interpreted into something similar and now represents a memory of her kindness to me.  
They were autobiographical.  
 
During a week of packing to move to Chicago.
They were done on vacations in times of reflection.
There is something about working weekly that gets your design mind flowing, and this is when great things happen.  All during 2009, I planned, designed, and executed "Road to Home", while simultaneously doing weekly quilts.  This quilt is tremendously successful for me ( so much so, I wonder if I can repeat it).
In 2010, I had a huge section of the summer where I was super busy.  My sister was getting married and I made her flowers out of fabric.  I traveled for work so much I felt I was never home.  I just had to suspend the weekly quilts until my life was back to normal.  This was the largest slump I was in, and because I was not working on my weekly deadline I could feel my creative juices sapping.  It took sheer force of will to get my ship righted.  I HAD to get back to weekly work.  Since that summer, I've published an article in a magazine, appeared on TV, demoed at Houston, given a lecture to 2 different groups, launched a shopping cart with merchandise, and have much more to come! And I still make weekly quilts. (And work full time)
********************
I really hope these blog posts help you see how working small and often can help you as a designer and artist.  Some of these are going to be incorporated into my lecture about weekly quilting. Thanks!

Tuesday, September 13, 2011

About Weekly Quilts - Part 3- Learning from the Masters

I'm continuing my "About Weekly Quilts" articles, this time discussing talking classes from other quilt artists and more.
*************************
Recently, there was a debate about why you should NOT take classes from other teachers/quilters, so that your style is not unduly influenced by those artists in an effort to strive to find your own.  Without going too much into that debate, I think that's tough to do, and I have no reservations about taking classes from other teachers.  Besides learning how to be a better teacher myself, unless a visual arts artist is blind, they will see something that will influence their work.  In addition, the "masters" all studied from and copied their favorite artists regularly throughout history, so why shouldn't we? 

So on this topic, when working weekly, it's a perfect time to try out something new.  Whether it's a magazine technique, a class sample that you never finished and cut down, or just "copying" a style of your favorite artist, using inspiration from other artists will definitely help you hone your skills.
Some examples are:
A quilt that was a magazine article that I adapted to a 6 inch size weekly quilt.

A weekly quilt that was part of my classwork in Judy Coates Perez's Fabric Painting class.

A quilt that I used to emulate Kathy York's dimensional work.

Each of these little quilts were done at various points in my weekly quilt career, and I learned from each of them.  Another benefit? Weekly and small quilts let you try a technique without a huge committment. My Technique of the Week series last year helped me try so many things without trying to slog through a wall sized piece knowing I hated the technique.  

My last installment "About Weekly Quilts" will take us back the the "Back to Basics" concepts of using them to keep your mind creatively sharp so you have fewer creative blocks!

Saturday, September 03, 2011

About Weekly Quilts - Part 2 - Finding your Voice

I'm continuing my "About Weekly Quilts" articles.  Check HERE for part 1.  
************************
When I started weekly quilts, I just made what I wanted in year one.  By year two, I wanted to expand the idea slightly and make quilts that changed themes each month.  By the end of that year, I had an amazing body of work to reflect on, 104 mini quilts all 6 x 6 inches.  
Hindsight is 20/20, and while you are making this much work you aren't aware you are developing your own voice and style, but you most certainly are. 
Check out these "early" works in which I started seeing my "super cute" style appearing...  
And my latest quilts...
Maybe I didn't realize that these trees would later appear in a larger work of mine... 
The nice thing is that I got to refine techniques in years three and four.  These quilts here:

Became this work here:
And this is just the tip of the iceberg in what I see in my own work. 
So, working weekly helped me flesh out ideas, sure.... but I also found my voice and my style.  It's varied, but definitely me.  And I think I'm really happy about that, and why I plan to continue down the weekly journal quilt path.  
Next time: Weekly quilts as class exercises.

Tuesday, August 23, 2011

About Weekly Quilts - Part 1- How did this start?

I'd like to talk to you all about my weekly quilt series and give you some of the ideas that have been brewing in my mind. I constantly get questions about my weekly series and small quilts in general.  I hope you enjoy this series!
***************
How did it start?
Back in 2005 or 2006, I don't really remember which, Martha Gilbert and I were at a guild retreat and she showed me her weekly "journal" quilts.  What was a journal quilt?  Well, apparently the fine quilters of the Quilt Art list were doing these small 8.5 x 11 inch quilts each month.  Any topic, any technique.  Ideally they "journalled" what was going on in their lives.  Martha was taking this a step further by doing these each week, each quilt 8.5 x 11 inches.

I was gobsmacked.  I worked (and still do) full time.  I had long wondered "How can I get into my quilt room more and make things more often?"  That's when this idea took hold.  If I quilted a mini quilt each week, I could actually finish something! Quilts don't have to be lap sized... They don't have to be wall hangings, either.  They could be, just to be! I would have to be in my studio.  I would have to design and make them on the fly in many cases.  I was ready to start this as my "new year's resolution" back in 2007.  It also gave me a reason to blog.  I wanted to show what I had made and have more reasons to post to my blog and this was perfect!

My first mini quilt was 6 x6 inches, using a chenille cutter I got for Christmas. My "week" is technically Monday through Sunday, so I have the entire weekend to complete my design.  Do I cheat and work on them late? YES.  Do I change my mind about the themes and regret picking a difficult one? YES.  Am I happy when I power through and get them done? YES, YES, YES! Do I always have "Show and Tell" for guild?  You betcha!

I have been doing these weekly quilts ever since, and it's an amazing body of work to go back and look at with both a critical and a stylistic eye.  The next parts of the weekly quilt series will tell you what I have learned about my self, my art, and my style by looking at the project as a whole.

Sunday, August 14, 2011

MOAR MEMES - Keyboard Cat


So yes, the Internet was made for cats and cat memes... and the Keyboard Cat phenomenon from a couple of years ago was a favorite of mine.  
Play him off, Keyboard cat!!!
I am likely going to add one of those greeting card recording devices to play the song along with this piece.  I'm having a blast with these quilts...

Thursday, August 11, 2011

Weekly Quilt - Meme Cats

Oh, the internet...  I love this cat video.  It's silly and annoying after about 3 minutes.  But it's soooo darn catchy!

That MUST be why I had to make my own, right?  This month's weekly quilt theme is "Meme Cats".  More next week!


Wednesday, June 15, 2011

New Weekly Quilt - QR Affirmation 1

Well, I didn't expect this would be as popular as it is, but thanks so much to those who are viewing this from The Guardian Online!  
This is the first in a series of mini quilts I'm doing this month that are "affirmations".  This is 8 x 8 inches.
These codes are everywhere and if you have a smartphone, you should be able to use a free QR code reader app to snap a picture of this and read what it says.  I'm not going to ruin that for you, so have fun figuring out what it says!
More are coming later this month.  This was a lot of fun.

Wednesday, June 01, 2011

Collaborative Canvas Weekly Quilt

At some point with the collaborative canvas, you go from this:
to bits of the same canvas all cut up, with no real discernible rhyme or reason.  It's at that point that I saw a leaf shape in the canvas, and thought to turn it into a flower.
Here's the finished piece.

Tuesday, May 24, 2011

New Weekly Quilts for May- Collaborative canvas

Here are a couple of new weekly quilts for May.  I had those lovely canvasses from my class in Cincinnati taught by Jamie Fingal and Leslie Tucker Jenison.  Often, with something as cool as these, you don't want to cut it up afterwards and you end up keeping them forever.  I wanted to use them in this month's themed works. I could not cut up the face I painted, so I used that portion whole.
This one is just an abstract.
I have 2 more coming later this week.  Enjoy!

Monday, May 16, 2011

Star Wars Quiltlet 4- Yoda

Do, or do not...there is no try.
I remember Star Wars in the movie theatre, but the one that stuck with me was Empire Strikes Back.  I was old enough to know what was going on, and the line from Yoda to Luke about moving past that mental block really stuck with me.  I'm the kind of person who "gets it done" in a crisis or stressful time.  Maybe it was because of Master Yoda.  
I got the idea to do this lil Yoda in the middle of the class I took from Lyric Kinard back in March. In my sketchbook, above one of my exercises for class, I doodled a little Yoda.   After refining the sketch, I put my fabrics to work.  All of my Star Wars quiltlets are done in Cherrywood Fabrics, those gorgeous hand dyes.  I accentuated Yoda's wrinkles with a grey fabric marker.
I hope you like him, as he finishes up March's Weekly Quilt series, and I'm off to work on all of April and May.   

Tuesday, January 04, 2011

Technique of the week #34- Mokume Shibori

Project Hours: 10 hours
Design and Materials: 1 hour

Execution: 9 hours 
This is my dye project for "...And then We Set it on Fire", a technique group I am part of for this year and which you can follow along on our blog.  I have put up more about how I did this technique there.  Go check it out!


I had the Quilting Arts Dec 2009/Jan 2010 issue out for this technique because I had the pleasure of meeting Enid at the Houston Quilt Festival.  In this issue was the last technique and this one.  Both fairly easy to do.


Sunday, January 02, 2011

Technique of the Week #33- Water Soluble Printing

Project Hours: 3 hours
Design and Materials: 1 hour

Execution: 2 hours 


This technique is by Susie Monday, and her directions are in the Dec 2009/Jan 2010 (last year's) Quilting Arts issue.  I also watched her Quilting Arts TV segment this week and was inspired to do this.
My drawing was made on some thin cotton that I stretched into a hoop to use as a screen of sorts. I used Caran D'Ache Neocolor II water soluble crayons I got from the art supply store. I drew this Octo very heavily and then slathered on a mix of matte medium and GAC 900 which is a fabric medium by Golden Acrylics. 
The first screen is always the crappy one, but this one that I quilted was screen #2 that I pulled.  The medium mixed some of the colors but I liked that.  This did have a little bit of a stiff hand because of the matte medium, but it was a fun technique that I will try again.

Sunday, November 28, 2010

Technique of the Week #30 - Freehand Discharge Paste Painting


Project Hours: 3 hours
Design and Materials: 1 hour

Execution: 2 hours 
Discharge Paste STINKS..... I mean it really, really smells bad.  If you can stand it in your well-ventilated workspace to work on this project, I'd suggest you give it a go.  Or wear a respirator. 
I freehand painted this octo onto blue fabric.  Now I have tried Discharge Paste before, so that was not the technique I was trying.  My previous experience has only been with screen printing with it.  So, to paint it on freehand was what I was after to see if it would work.
I painted it on, and waited for it to dry and then steamed it to make the Discharge Paste work.  My iron bubbled a bunch of water on the fabric and my octo came out with some neat spots.  I also did not know what color the blue would discharge out as.  That was pretty cool.
I can see lots of freehand work in my future... if I can stand the smell.

Sunday, November 21, 2010

Technique of the Week #29 - Sticker Resist

Project Hours: 3 hours
Design and Materials: 1 hour
Execution: 2 hours
YES!  It's good to be back!  This week's technique is from the December/January 2009/2010 issue of Quilting Arts. While in Houston I had the great pleasure of meeting Enid Gjelten Weichselbaum, the author of this technique.  Basically, using a "dry brushing" technique over stickers, you get some great resist effects.  I used some foam stickers to spell out this phrase from H.P. Lovecraft and his short story "The Call of Cthulhu". 
Her article says that phrases are not recommended and I can see why.  These small stickers made making sure my paint was clearly in all of the little nooks and crannies a bit tough.  Also, if your spacing was not right, your phrases could come out jumbled and look like giant run-on sentences.  I worked my phrase from the bottom up.
This was quick to do, and the stickers I used were from Michaels and only $2.99 for my small pack of them. There are larger letters and more in the scrap book section.  If you have this issue, dig it out and give it a try!

Wednesday, September 29, 2010

Technique of the Week #28 - Custom Rust Dyeing

Project Hours: 72 hours
Design and Materials: 2 hours
Execution: 70 hours

Before you look at the number of hours this took, be advised a lot of it is WAITING.  If you are not good at waiting, well, this may not be a project for you.

Everyone and their sister is rust dyeing lately.  It's pretty easy to do, and you can find lots of instructions by putting "rust dyeing" into Google, so I'll let you do that, because that's what I did.  However, I did not just want to wrap fabric around the nearest rusty object and hope it came out nicely, I wanted to rust custom shapes.  However that meant finding a steel object and cutting it to my shape and letting it rust so I could use it to dye.  This is a conundrum.
My dear husband's hobby and mine intertwined, because he uses some sheet steel in his Miniature painting hobby. The stuff he uses had a label that interested me greatly: Quick Rust™ Steel. This thin steel can be cut with scissors, and then you follow the package instructions to rust it.   Using the internet rust dyeing instructions, I had a rusted composition that was rusted, and then dyeing within 24 hours.  There's lots that can be done with this using this product as your rusting base!  No more random shapes, shibori method fabrics. Do these shapes look familiar? The templates I used were from a weekly quilt project in 2008.

What people say about sewing through rusted fabric is true.  It's really difficult.  I had a heavy weight needle and it barely wanted to punch through.  In fact, I thought my machine was acting up, when it was just the thickness the material becomes with rusting.  I switched to lightweight sharps, and still my thread broke, frayed, the needle refused to punch the fabric, etc.  I even picked out all of the existing stitches to put in a lighter loft batting to hopefully take the batting out of the equation.  I offer this as advice to you if you try it. 

Sunday, September 26, 2010

Technique of the Week #27 - Stuffed Dimensional Appliques

Project Hours: 4 hours
Design and Materials: 1 hour
Execution: 3 hours
I love the work of Kathy York.  She is a quilt artist who can think "outside the box" dimensionally.  She's got two rather "famous" works that have seen publication and exhibition that are dimensional.  The first is Little Fish in a Big City, and th esecond is called Synchronized Swimming.  You can see them here at her website.
I'm not Kathy York, and I'm not going to make a bajillion little fishes to put on my weekly quiltlet.  But I wanted to get a sense of HOW to apply this idea to a quilt surface, and I came up with this stuffed tentacle.  I drew a pattern, added about a third of an inch to each side because I knew stuffing it would draw it upwards, and then sewed the fabric tentacle.  I added yo-yos for suckers.  Pretty cool technique, sewing it down was easy using a variation of a blind hem stitch.  The edge of the background quilt is not wonky, but scanning this stuffed sucker was...
I'm amazed that the cephalopod theme continues strongly so far this year!  It's a fun theme.

Monday, September 13, 2010

Technique of the Week #26 - Extravorganza

Project Hours: 4 hours
Design and Materials: 1 hour
Execution: 3 hours
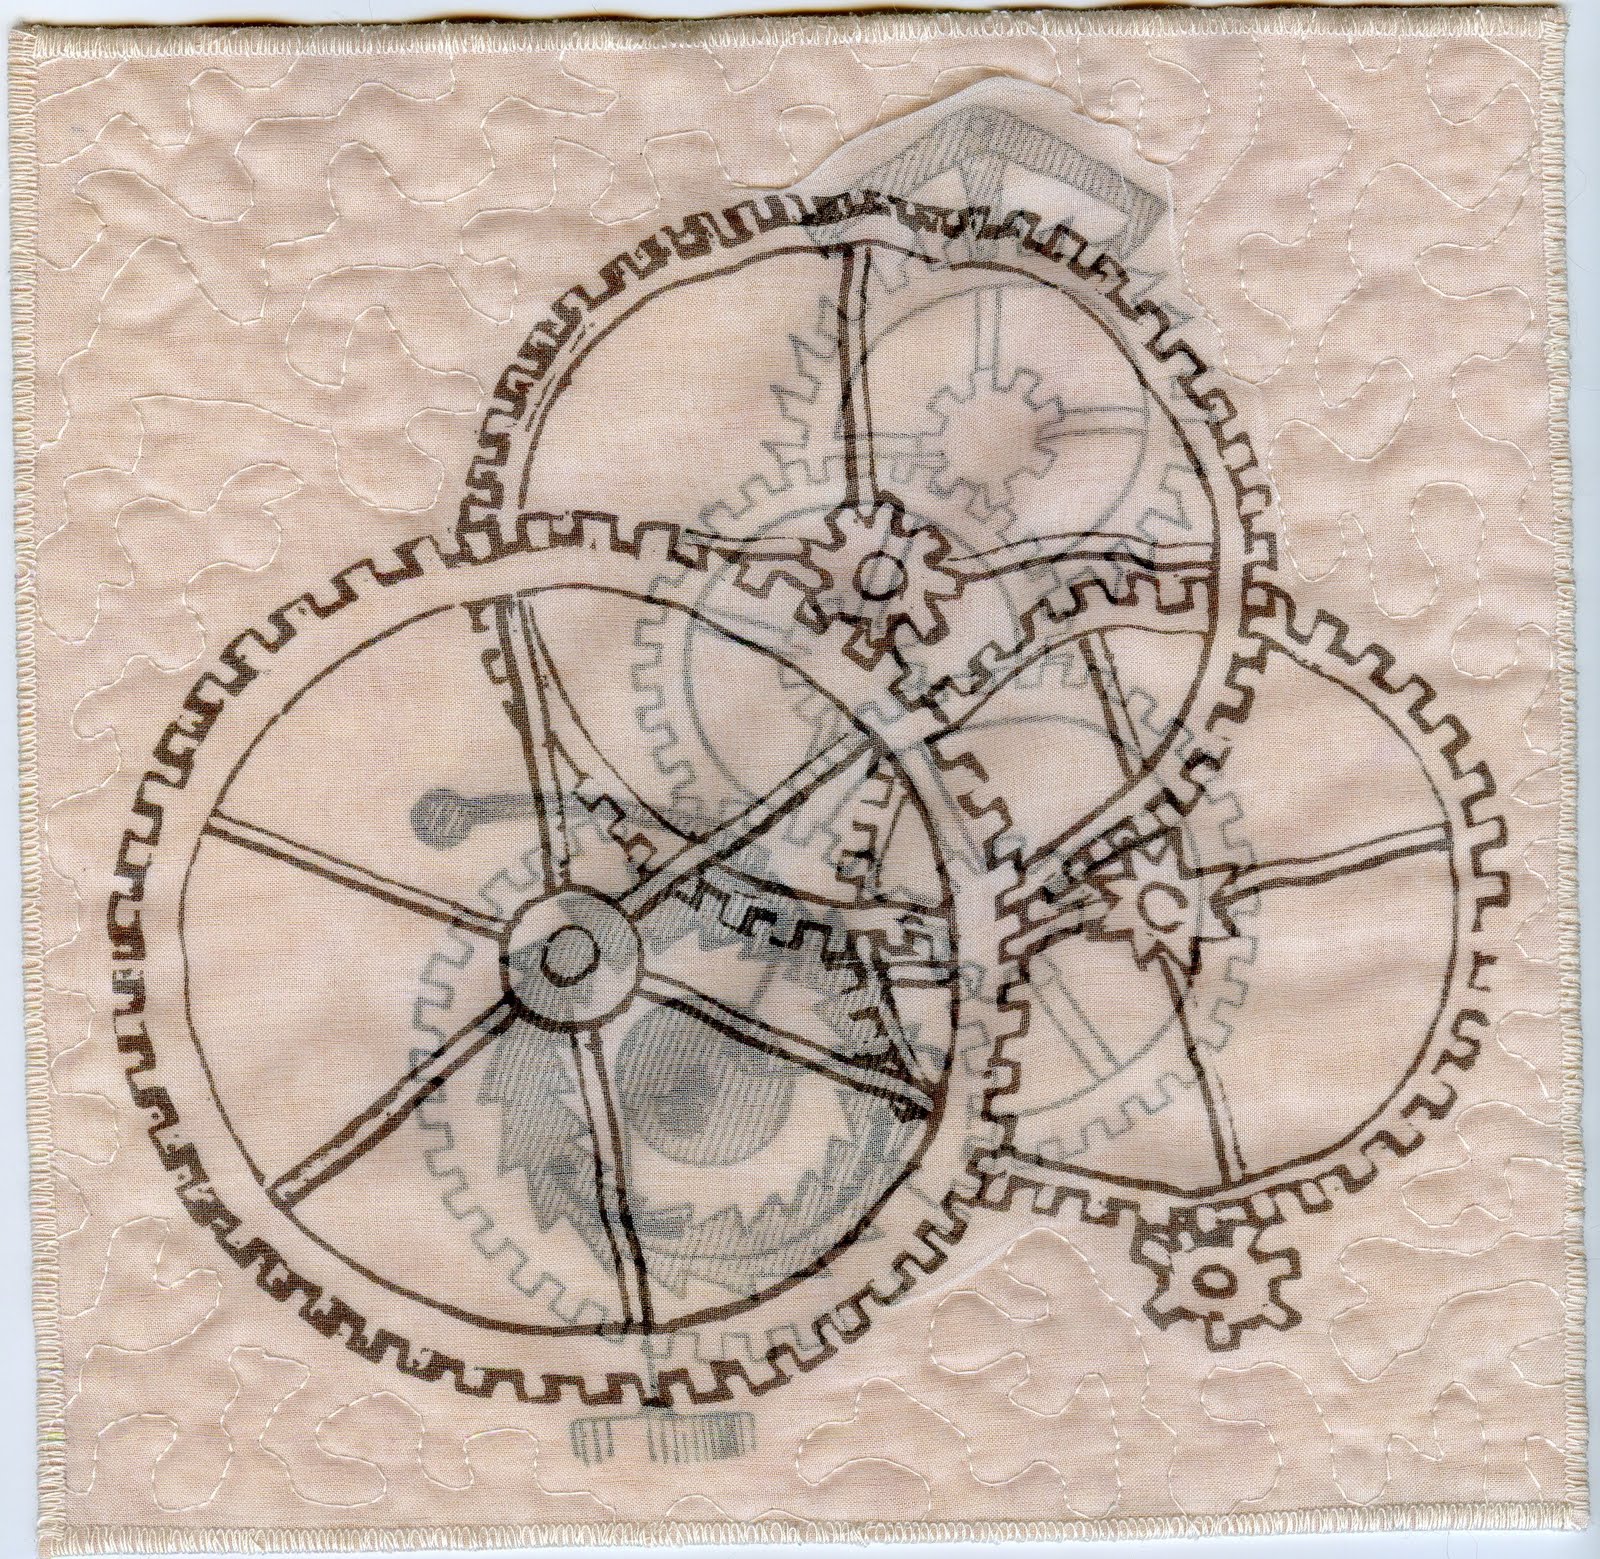
This is using a product called Extravorganza, made by Jaquard.  They make great paints, and this ink-jet printable organza fabric was high on my list of things to try, because I want to envision a much larger project using this (or a similar) technique.  
I used 2 sheets of the Extravorganza and printed out these gears with the idea that I would layer them like looking into a machine.  I printed them using the advanced printer settings to make the ink "heavy" when I printed them because I knew I wanted them to be dark in order to show through. You also ned to let this dry a while before using it, because your ink will smudge on your organza if not allowed to dry properly. Unfortunately for my little sample here, the bottom cotton fabric layer is really lost color wise, and the first gear is pretty hard to see in person.
It was hard to sew 2 layers of organza on top of one another enough to quilt them, and my motif in the middle developed a bubble that ironed into a funky crease at the top of the work.  
There were a few failures of the overall design, but the product was really easy to use and I had fun deciding what to print and sizing it in my software.  I could see using single layers of this for text and other similar applications, but 2 layers were hard to sew.  Your mileage may vary! :)

Wednesday, September 08, 2010

Technique of the Week #25 - Screenprinting with Mask Ease

Project Hours: 4 hours
Design and Materials: 1 hour
Execution: 3 hours
The product for this technique is called Mask Ease by Scratch-Art.  This stuff is a vinyl mask that you apply to a prepared screen for screenprinting, and it acts as your resist so you can screen through it.  I have some pictures of the process this time, to explain better.  
I did not have a screen around, so I used some sheer cotton fabric and a wood embroidery hoop that cost me 99 cents.  I wrapped the inner hoop with floral tape to make it sticky and pulled my fabric tight and put glue around the edges once I was sure it was taut.  I then used the circle of the hoop to make my pattern. 
I drew my cuttlefish onto the yellow vinyl surface.  He's going to be reversed in print, so keep that in mind.
Then you cut the vinyl with an X-Acto knife to expose your lines.  I followed the Mask Ease Instructions from here, adhering it to my screen and printing as usual.
One other note is that this needs to be used with good thick print paste or ink, as the large open surfaces can get runny onto fabric.  I'm still not a good screenprinter and I had several runny attempts before I thickened up my print paste. 
I do like this little guy. I wanted him to be a little bigger to fill the space of the quilt a little better, so I think next time I will add borders or get an actual screen for screenprinting or a bigger embroidery hoop.  (It is a cheap alternative)