Project Hours: 2 hours
Design and Materials: 1 hour
Execution: 1 hour +
This project was so fun and it didn't hardly take any time at all to do. All you need is a can of shaving cream, a wipe-able surface and some Tsukineko inks.
To start, you spray your shaving cream (not the gel kind) in a section on your table or surface. Then you smooth it out with a flat edge of a ruler or piece of cardboard.
Then you drip on your inks, and I used the end of a paintbrush to drag through them for some marbling effects.
Then you lay your fabric onto the surface of the shaving cream to pick up the ink and gently pat until you see the ink through the back of the fabric. Wait about 5 minutes, then wipe the excess cream off the fabric. Iron well when dry.
It was so fun! I even did an octopus for the Technique of the Week project series!
Showing posts with label technique of the week. Show all posts
Wednesday, July 11, 2012
Tuesday, July 03, 2012
Technique of the Week #37 - Suminagashi Marbling on Fabric
Project Hours: 2 hours
Design and Materials: 1 hourExecution: 1 hour +
Suminagashi is a marbling technique for fabric or paper that is done with inks that float on top of the surface of water. I learned about this technique from a recent meeting of the Fiber Art Divas, and went to Dick Blick to purchase the supplies to try it.
The cool thing about this technique (or the most frustrating part) is that the design is mostly up to how steady you are at dropping the ink onto the surface of the water, and any air current or bumping of the table you do. If you like organic results, this is for you!
I got the above palate pan and filled it with about an inch and a half of water. I got this marbling kit in the airbrush ink section. It's from Japan, made for this technique. You use the paintbrushes to lightly dab the ink onto the surface of the water. You then use a surfactant (like a little dish soap in water) to separate your colors and layers. Blowing on the water or dragging a cat whisker through the water creates the patterns. You lay your fabric down in a sort of roll to pick up the ink on the surface of the water.
I finished playing with this technique in about 2 hours, so it was a perfect distraction from my busy days. My results are below, done on PFD (Prepared For Dyeing) fabric. I cold over marble and do other things for greater effect, but I had a blast. Now what to make out of the fabric?
Design and Materials: 1 hourExecution: 1 hour +
Suminagashi is a marbling technique for fabric or paper that is done with inks that float on top of the surface of water. I learned about this technique from a recent meeting of the Fiber Art Divas, and went to Dick Blick to purchase the supplies to try it.
The cool thing about this technique (or the most frustrating part) is that the design is mostly up to how steady you are at dropping the ink onto the surface of the water, and any air current or bumping of the table you do. If you like organic results, this is for you!
I got the above palate pan and filled it with about an inch and a half of water. I got this marbling kit in the airbrush ink section. It's from Japan, made for this technique. You use the paintbrushes to lightly dab the ink onto the surface of the water. You then use a surfactant (like a little dish soap in water) to separate your colors and layers. Blowing on the water or dragging a cat whisker through the water creates the patterns. You lay your fabric down in a sort of roll to pick up the ink on the surface of the water.
I finished playing with this technique in about 2 hours, so it was a perfect distraction from my busy days. My results are below, done on PFD (Prepared For Dyeing) fabric. I cold over marble and do other things for greater effect, but I had a blast. Now what to make out of the fabric?
Sunday, July 17, 2011
Technique of the Week #36 - Batik Wax Resist
Project Hours: 6 hours
Design and Materials: 1 hour
Execution: 5 hours
Ok. I threw in the towel on this one because I am really, really bad at this technique. I did 4 different batik designs, and this is the only one that came out remotely decent, and I still don't care for it.
I used real batik wax that I got a year ago at one of the IQF shows. I got a melter pot just for the wax. I used a tjanting tool. I practiced. The wax was smelly and I was very patient.
I did not use PFD fabric, which may be problem #1. I did not let the wax soak into the fabric well, which was definitely problem #2. I also tried what someone recommended and very lightly ironed the back of one of the pieces (not pictured) that just ran my design into a giant puddle of wax onto the fabric. Into the trash that one went. (Note:I normally never condone throwing attempts into the garbage... sometimes you can save a bad piece, but these could not be saved, they were that bad)
I used Setacolor paints instead of dyes, but I don't think that was any issue here. You can see that it ran underneath my batik lines, so that would have happened either way.
I am NOT good at batiking. I really suck at it. So, you know, I guess it's good to know that right?
Right after I chucked (literally) 3 of the other pieces in the garbage, I signed up for a Soy Wax Class at CREATE, which is coming here to Chicago in August. I hope to be a LOT better with soy wax than this crazy wax I have.
Design and Materials: 1 hour
Execution: 5 hours
Ok. I threw in the towel on this one because I am really, really bad at this technique. I did 4 different batik designs, and this is the only one that came out remotely decent, and I still don't care for it.
I used real batik wax that I got a year ago at one of the IQF shows. I got a melter pot just for the wax. I used a tjanting tool. I practiced. The wax was smelly and I was very patient.
I did not use PFD fabric, which may be problem #1. I did not let the wax soak into the fabric well, which was definitely problem #2. I also tried what someone recommended and very lightly ironed the back of one of the pieces (not pictured) that just ran my design into a giant puddle of wax onto the fabric. Into the trash that one went. (Note:I normally never condone throwing attempts into the garbage... sometimes you can save a bad piece, but these could not be saved, they were that bad)
I used Setacolor paints instead of dyes, but I don't think that was any issue here. You can see that it ran underneath my batik lines, so that would have happened either way.
I am NOT good at batiking. I really suck at it. So, you know, I guess it's good to know that right?
Right after I chucked (literally) 3 of the other pieces in the garbage, I signed up for a Soy Wax Class at CREATE, which is coming here to Chicago in August. I hope to be a LOT better with soy wax than this crazy wax I have.
Tuesday, July 05, 2011
Technique of the Week #35 - Gelli Arts Gel Plate Monoprinting
After a brief hiatus, "Technique of the Week" is back for a couple of weeks to show you some cool stuff! My plan was to eventually finish all 52 weeks, so here's week #35!
Project Hours: 2 hours
Design and Materials: 1/2 hour
Execution: 1 1/2 hours
On my list of Techniques to try for this series, "gelatin monoprinting" stuck out at me for a long time and I was not inspired on getting it started.
Then I got this new product called the Gel Printing Plate from Gelli Arts. After seeing the video on how to use it, I was hooked, and could not wait to try it out on fabric.
Here are all of my supplies and my Gel Plate ready to go. I used regular cotton fabric (my favorite Southern Belle white from Springs) and SetaColor paint for fabric.
I started off simple, by adding a smidge of paint and rolling it out on the gel plate with my brayer. In between colors, I rolled off the paint onto regular computer paper. It worked really well, even when using a light yellow next.
I eventually got fancy by adding 2 colors to the same plate and also over printing.
Here's some of the papers I made too!
This was so much fun, but not seconds after I cleaned it all up (with water- super easy!) and put it all away, I realized I didn't print an Octopus for my TOW themed quiltlets. I pulled it all back out and played again! It took about 10 minutes for set up, and 15 minutes to clean it all up. Super easy! No gelatin molds to cook, refrigerate, break apart, etc! I was so glad this product came along so I could try this.
To get your own, check out the Gelli Arts page!
Project Hours: 2 hours
Design and Materials: 1/2 hour
Execution: 1 1/2 hours
On my list of Techniques to try for this series, "gelatin monoprinting" stuck out at me for a long time and I was not inspired on getting it started.
Then I got this new product called the Gel Printing Plate from Gelli Arts. After seeing the video on how to use it, I was hooked, and could not wait to try it out on fabric.
Here are all of my supplies and my Gel Plate ready to go. I used regular cotton fabric (my favorite Southern Belle white from Springs) and SetaColor paint for fabric.
I started off simple, by adding a smidge of paint and rolling it out on the gel plate with my brayer. In between colors, I rolled off the paint onto regular computer paper. It worked really well, even when using a light yellow next.
I eventually got fancy by adding 2 colors to the same plate and also over printing.
Here's some of the papers I made too!
This was so much fun, but not seconds after I cleaned it all up (with water- super easy!) and put it all away, I realized I didn't print an Octopus for my TOW themed quiltlets. I pulled it all back out and played again! It took about 10 minutes for set up, and 15 minutes to clean it all up. Super easy! No gelatin molds to cook, refrigerate, break apart, etc! I was so glad this product came along so I could try this.
To get your own, check out the Gelli Arts page!
Tuesday, January 04, 2011
Technique of the week #34- Mokume Shibori
Project Hours: 10 hours
Design and Materials: 1 hour
Execution: 9 hours
This is my dye project for "...And then We Set it on Fire", a technique group I am part of for this year and which you can follow along on our blog. I have put up more about how I did this technique there. Go check it out!
I had the Quilting Arts Dec 2009/Jan 2010 issue out for this technique because I had the pleasure of meeting Enid at the Houston Quilt Festival. In this issue was the last technique and this one. Both fairly easy to do.
Design and Materials: 1 hour
Execution: 9 hours
This is my dye project for "...And then We Set it on Fire", a technique group I am part of for this year and which you can follow along on our blog. I have put up more about how I did this technique there. Go check it out!
I had the Quilting Arts Dec 2009/Jan 2010 issue out for this technique because I had the pleasure of meeting Enid at the Houston Quilt Festival. In this issue was the last technique and this one. Both fairly easy to do.
Sunday, January 02, 2011
Technique of the Week #33- Water Soluble Printing
Project Hours: 3 hours
Design and Materials: 1 hour
Execution: 2 hours
This technique is by Susie Monday, and her directions are in the Dec 2009/Jan 2010 (last year's) Quilting Arts issue. I also watched her Quilting Arts TV segment this week and was inspired to do this.
My drawing was made on some thin cotton that I stretched into a hoop to use as a screen of sorts. I used Caran D'Ache Neocolor II water soluble crayons I got from the art supply store. I drew this Octo very heavily and then slathered on a mix of matte medium and GAC 900 which is a fabric medium by Golden Acrylics.
The first screen is always the crappy one, but this one that I quilted was screen #2 that I pulled. The medium mixed some of the colors but I liked that. This did have a little bit of a stiff hand because of the matte medium, but it was a fun technique that I will try again.
Design and Materials: 1 hour
Execution: 2 hours
This technique is by Susie Monday, and her directions are in the Dec 2009/Jan 2010 (last year's) Quilting Arts issue. I also watched her Quilting Arts TV segment this week and was inspired to do this.
My drawing was made on some thin cotton that I stretched into a hoop to use as a screen of sorts. I used Caran D'Ache Neocolor II water soluble crayons I got from the art supply store. I drew this Octo very heavily and then slathered on a mix of matte medium and GAC 900 which is a fabric medium by Golden Acrylics.
The first screen is always the crappy one, but this one that I quilted was screen #2 that I pulled. The medium mixed some of the colors but I liked that. This did have a little bit of a stiff hand because of the matte medium, but it was a fun technique that I will try again.
Monday, December 13, 2010
Technique of the Week #32 - Electroluminescent Wire
Project Hours: 5 hours
Design and Materials: 1 hour
Execution: 4 hours
To say that I love the electronic convergence of tech and textile is an understatement. I don't just love it, I LURVE it. Love love love it.
So when I saw fashion students using electroluminescent wire in garments, I just HAD to try it. EL Wire is readily available on the internet, and if you saw my little video with Pokey Bolton, you know I found some by typing it into the almighty Google machine to locate some.
That piece was in my gallery show and some other places, but it was really my trial piece. I didn't know what to do with it, how to get it to stay in shape, etc. i have perfected it now, and while I can't give away all my secrets (yet) on how to do it, I know you're all smart folks and can come up with some amazing designs of your own.
Sticking with my octo theme for the year, this little bugger is done with 3 feet of El Wire, and it's an 8 inch piece. Almost all of the time was spent on shaping and sewing down the wire. It's a flexible tube, not unlike your iPod cord. So take a look at that cord and imagine bending it into tight corners, etc and you will see the dilemma here.
But, oh, when it's done, it sure looks pretty all lit up. The swirled background gives him an eye in shadow when he's lit up.
Design and Materials: 1 hour
Execution: 4 hours
To say that I love the electronic convergence of tech and textile is an understatement. I don't just love it, I LURVE it. Love love love it.
So when I saw fashion students using electroluminescent wire in garments, I just HAD to try it. EL Wire is readily available on the internet, and if you saw my little video with Pokey Bolton, you know I found some by typing it into the almighty Google machine to locate some.
That piece was in my gallery show and some other places, but it was really my trial piece. I didn't know what to do with it, how to get it to stay in shape, etc. i have perfected it now, and while I can't give away all my secrets (yet) on how to do it, I know you're all smart folks and can come up with some amazing designs of your own.
Sticking with my octo theme for the year, this little bugger is done with 3 feet of El Wire, and it's an 8 inch piece. Almost all of the time was spent on shaping and sewing down the wire. It's a flexible tube, not unlike your iPod cord. So take a look at that cord and imagine bending it into tight corners, etc and you will see the dilemma here.
But, oh, when it's done, it sure looks pretty all lit up. The swirled background gives him an eye in shadow when he's lit up.
Technique of the Week #31 - Decolorant
Project Hours: 3 hours
Design and Materials: 1 hour
Execution: 2 hours
In a similar vein as TOW #30, this is a discharge/bleaching paste that deposits color as you bleach. It has a citrus smell, so it was not as offensive as the regular Jaquard discharge paste.
I screened this using the silk screen I made in this TOW project. I was short on time and haven't quilted it yet. I really liked how the color looked against this black cotton sateen, even if the sateen is a bit fuzz laden. I'm also showing you the back so you can see how much it bleached out. You need a good thick layer of this stuff to get this kind of result, there are 2 other "pulls" I did not get a good result on. Try this stuff, it comes in lots of fun colors!
Design and Materials: 1 hour
Execution: 2 hours
In a similar vein as TOW #30, this is a discharge/bleaching paste that deposits color as you bleach. It has a citrus smell, so it was not as offensive as the regular Jaquard discharge paste.
I screened this using the silk screen I made in this TOW project. I was short on time and haven't quilted it yet. I really liked how the color looked against this black cotton sateen, even if the sateen is a bit fuzz laden. I'm also showing you the back so you can see how much it bleached out. You need a good thick layer of this stuff to get this kind of result, there are 2 other "pulls" I did not get a good result on. Try this stuff, it comes in lots of fun colors!
Sunday, November 28, 2010
Technique of the Week #30 - Freehand Discharge Paste Painting
Project Hours: 3 hours
Design and Materials: 1 hour
Execution: 2 hours
Discharge Paste STINKS..... I mean it really, really smells bad. If you can stand it in your well-ventilated workspace to work on this project, I'd suggest you give it a go. Or wear a respirator.
I freehand painted this octo onto blue fabric. Now I have tried Discharge Paste before, so that was not the technique I was trying. My previous experience has only been with screen printing with it. So, to paint it on freehand was what I was after to see if it would work.
I painted it on, and waited for it to dry and then steamed it to make the Discharge Paste work. My iron bubbled a bunch of water on the fabric and my octo came out with some neat spots. I also did not know what color the blue would discharge out as. That was pretty cool.
I can see lots of freehand work in my future... if I can stand the smell.
Sunday, November 21, 2010
Technique of the Week #29 - Sticker Resist
Project Hours: 3 hours
Design and Materials: 1 hour
Execution: 2 hours
YES! It's good to be back! This week's technique is from the December/January 2009/2010 issue of Quilting Arts. While in Houston I had the great pleasure of meeting Enid Gjelten Weichselbaum, the author of this technique. Basically, using a "dry brushing" technique over stickers, you get some great resist effects. I used some foam stickers to spell out this phrase from H.P. Lovecraft and his short story "The Call of Cthulhu".
Her article says that phrases are not recommended and I can see why. These small stickers made making sure my paint was clearly in all of the little nooks and crannies a bit tough. Also, if your spacing was not right, your phrases could come out jumbled and look like giant run-on sentences. I worked my phrase from the bottom up.
This was quick to do, and the stickers I used were from Michaels and only $2.99 for my small pack of them. There are larger letters and more in the scrap book section. If you have this issue, dig it out and give it a try!
Design and Materials: 1 hour
Execution: 2 hours
YES! It's good to be back! This week's technique is from the December/January 2009/2010 issue of Quilting Arts. While in Houston I had the great pleasure of meeting Enid Gjelten Weichselbaum, the author of this technique. Basically, using a "dry brushing" technique over stickers, you get some great resist effects. I used some foam stickers to spell out this phrase from H.P. Lovecraft and his short story "The Call of Cthulhu".
Her article says that phrases are not recommended and I can see why. These small stickers made making sure my paint was clearly in all of the little nooks and crannies a bit tough. Also, if your spacing was not right, your phrases could come out jumbled and look like giant run-on sentences. I worked my phrase from the bottom up.
This was quick to do, and the stickers I used were from Michaels and only $2.99 for my small pack of them. There are larger letters and more in the scrap book section. If you have this issue, dig it out and give it a try!
Wednesday, September 29, 2010
Technique of the Week #28 - Custom Rust Dyeing
Project Hours: 72 hours
Design and Materials: 2 hours
Execution: 70 hours
Before you look at the number of hours this took, be advised a lot of it is WAITING. If you are not good at waiting, well, this may not be a project for you.
Everyone and their sister is rust dyeing lately. It's pretty easy to do, and you can find lots of instructions by putting "rust dyeing" into Google, so I'll let you do that, because that's what I did. However, I did not just want to wrap fabric around the nearest rusty object and hope it came out nicely, I wanted to rust custom shapes. However that meant finding a steel object and cutting it to my shape and letting it rust so I could use it to dye. This is a conundrum.
My dear husband's hobby and mine intertwined, because he uses some sheet steel in his Miniature painting hobby. The stuff he uses had a label that interested me greatly: Quick Rust™ Steel. This thin steel can be cut with scissors, and then you follow the package instructions to rust it. Using the internet rust dyeing instructions, I had a rusted composition that was rusted, and then dyeing within 24 hours. There's lots that can be done with this using this product as your rusting base! No more random shapes, shibori method fabrics. Do these shapes look familiar? The templates I used were from a weekly quilt project in 2008.
What people say about sewing through rusted fabric is true. It's really difficult. I had a heavy weight needle and it barely wanted to punch through. In fact, I thought my machine was acting up, when it was just the thickness the material becomes with rusting. I switched to lightweight sharps, and still my thread broke, frayed, the needle refused to punch the fabric, etc. I even picked out all of the existing stitches to put in a lighter loft batting to hopefully take the batting out of the equation. I offer this as advice to you if you try it.
Design and Materials: 2 hours
Execution: 70 hours
Before you look at the number of hours this took, be advised a lot of it is WAITING. If you are not good at waiting, well, this may not be a project for you.
Everyone and their sister is rust dyeing lately. It's pretty easy to do, and you can find lots of instructions by putting "rust dyeing" into Google, so I'll let you do that, because that's what I did. However, I did not just want to wrap fabric around the nearest rusty object and hope it came out nicely, I wanted to rust custom shapes. However that meant finding a steel object and cutting it to my shape and letting it rust so I could use it to dye. This is a conundrum.
My dear husband's hobby and mine intertwined, because he uses some sheet steel in his Miniature painting hobby. The stuff he uses had a label that interested me greatly: Quick Rust™ Steel. This thin steel can be cut with scissors, and then you follow the package instructions to rust it. Using the internet rust dyeing instructions, I had a rusted composition that was rusted, and then dyeing within 24 hours. There's lots that can be done with this using this product as your rusting base! No more random shapes, shibori method fabrics. Do these shapes look familiar? The templates I used were from a weekly quilt project in 2008.
What people say about sewing through rusted fabric is true. It's really difficult. I had a heavy weight needle and it barely wanted to punch through. In fact, I thought my machine was acting up, when it was just the thickness the material becomes with rusting. I switched to lightweight sharps, and still my thread broke, frayed, the needle refused to punch the fabric, etc. I even picked out all of the existing stitches to put in a lighter loft batting to hopefully take the batting out of the equation. I offer this as advice to you if you try it.
Sunday, September 26, 2010
Technique of the Week #27 - Stuffed Dimensional Appliques
Project Hours: 4 hours
Design and Materials: 1 hour
Execution: 3 hours
I love the work of Kathy York. She is a quilt artist who can think "outside the box" dimensionally. She's got two rather "famous" works that have seen publication and exhibition that are dimensional. The first is Little Fish in a Big City, and th esecond is called Synchronized Swimming. You can see them here at her website.
I'm not Kathy York, and I'm not going to make a bajillion little fishes to put on my weekly quiltlet. But I wanted to get a sense of HOW to apply this idea to a quilt surface, and I came up with this stuffed tentacle. I drew a pattern, added about a third of an inch to each side because I knew stuffing it would draw it upwards, and then sewed the fabric tentacle. I added yo-yos for suckers. Pretty cool technique, sewing it down was easy using a variation of a blind hem stitch. The edge of the background quilt is not wonky, but scanning this stuffed sucker was...
I'm amazed that the cephalopod theme continues strongly so far this year! It's a fun theme.
Design and Materials: 1 hour
Execution: 3 hours
I love the work of Kathy York. She is a quilt artist who can think "outside the box" dimensionally. She's got two rather "famous" works that have seen publication and exhibition that are dimensional. The first is Little Fish in a Big City, and th esecond is called Synchronized Swimming. You can see them here at her website.
I'm not Kathy York, and I'm not going to make a bajillion little fishes to put on my weekly quiltlet. But I wanted to get a sense of HOW to apply this idea to a quilt surface, and I came up with this stuffed tentacle. I drew a pattern, added about a third of an inch to each side because I knew stuffing it would draw it upwards, and then sewed the fabric tentacle. I added yo-yos for suckers. Pretty cool technique, sewing it down was easy using a variation of a blind hem stitch. The edge of the background quilt is not wonky, but scanning this stuffed sucker was...
I'm amazed that the cephalopod theme continues strongly so far this year! It's a fun theme.
Monday, September 13, 2010
Technique of the Week #26 - Extravorganza
Project Hours: 4 hours
Design and Materials: 1 hour
Execution: 3 hours
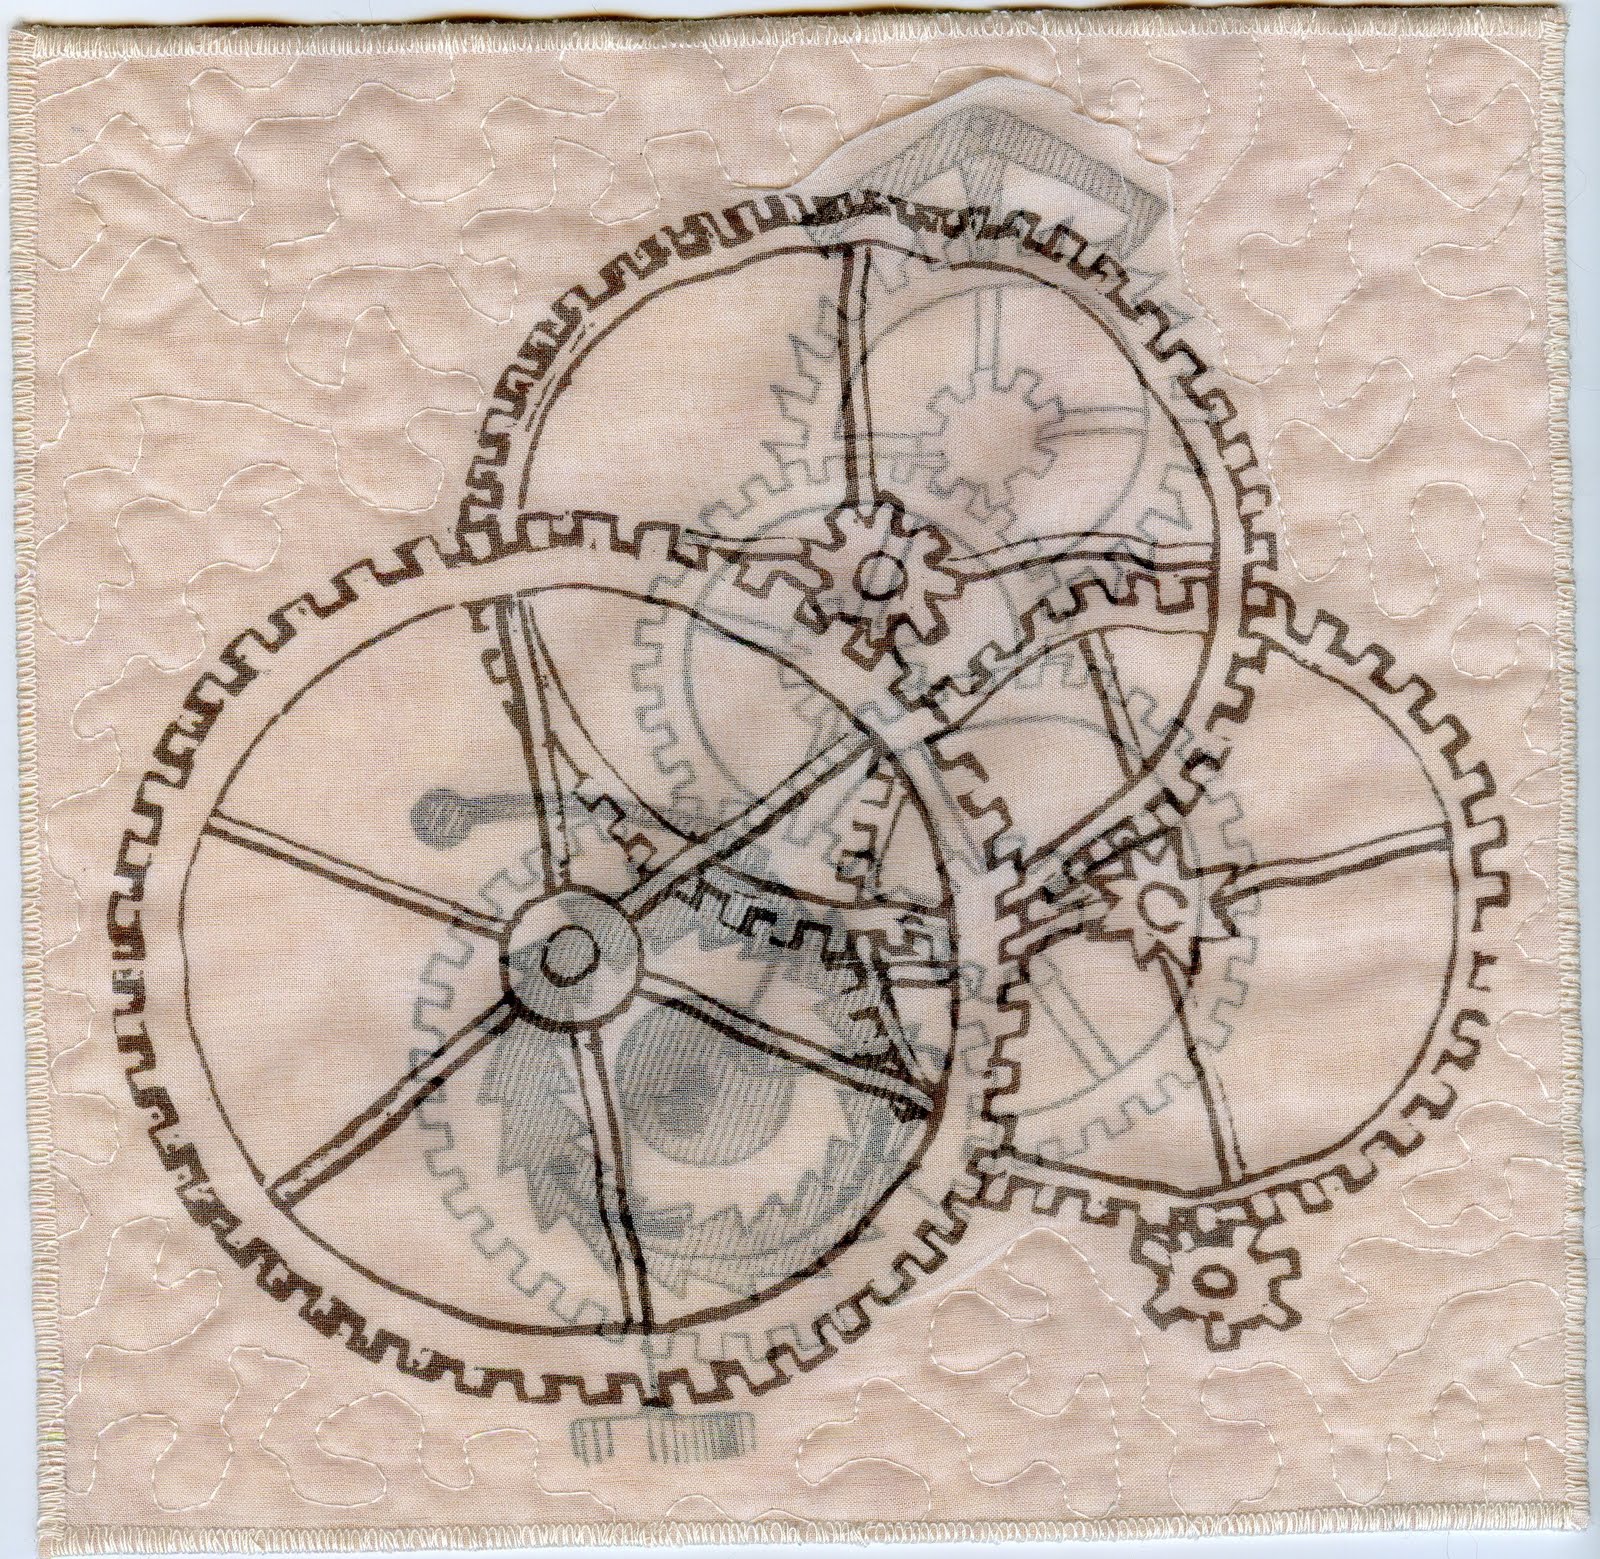
This is using a product called Extravorganza, made by Jaquard. They make great paints, and this ink-jet printable organza fabric was high on my list of things to try, because I want to envision a much larger project using this (or a similar) technique.
I used 2 sheets of the Extravorganza and printed out these gears with the idea that I would layer them like looking into a machine. I printed them using the advanced printer settings to make the ink "heavy" when I printed them because I knew I wanted them to be dark in order to show through. You also ned to let this dry a while before using it, because your ink will smudge on your organza if not allowed to dry properly. Unfortunately for my little sample here, the bottom cotton fabric layer is really lost color wise, and the first gear is pretty hard to see in person.
It was hard to sew 2 layers of organza on top of one another enough to quilt them, and my motif in the middle developed a bubble that ironed into a funky crease at the top of the work.
There were a few failures of the overall design, but the product was really easy to use and I had fun deciding what to print and sizing it in my software. I could see using single layers of this for text and other similar applications, but 2 layers were hard to sew. Your mileage may vary! :)
Design and Materials: 1 hour
Execution: 3 hours
This is using a product called Extravorganza, made by Jaquard. They make great paints, and this ink-jet printable organza fabric was high on my list of things to try, because I want to envision a much larger project using this (or a similar) technique.
I used 2 sheets of the Extravorganza and printed out these gears with the idea that I would layer them like looking into a machine. I printed them using the advanced printer settings to make the ink "heavy" when I printed them because I knew I wanted them to be dark in order to show through. You also ned to let this dry a while before using it, because your ink will smudge on your organza if not allowed to dry properly. Unfortunately for my little sample here, the bottom cotton fabric layer is really lost color wise, and the first gear is pretty hard to see in person.
It was hard to sew 2 layers of organza on top of one another enough to quilt them, and my motif in the middle developed a bubble that ironed into a funky crease at the top of the work.
There were a few failures of the overall design, but the product was really easy to use and I had fun deciding what to print and sizing it in my software. I could see using single layers of this for text and other similar applications, but 2 layers were hard to sew. Your mileage may vary! :)
Wednesday, September 08, 2010
Technique of the Week #25 - Screenprinting with Mask Ease
Project Hours: 4 hours
Design and Materials: 1 hour
Execution: 3 hours
The product for this technique is called Mask Ease by Scratch-Art. This stuff is a vinyl mask that you apply to a prepared screen for screenprinting, and it acts as your resist so you can screen through it. I have some pictures of the process this time, to explain better.
I did not have a screen around, so I used some sheer cotton fabric and a wood embroidery hoop that cost me 99 cents. I wrapped the inner hoop with floral tape to make it sticky and pulled my fabric tight and put glue around the edges once I was sure it was taut. I then used the circle of the hoop to make my pattern.
I drew my cuttlefish onto the yellow vinyl surface. He's going to be reversed in print, so keep that in mind.
Then you cut the vinyl with an X-Acto knife to expose your lines. I followed the Mask Ease Instructions from here, adhering it to my screen and printing as usual.
One other note is that this needs to be used with good thick print paste or ink, as the large open surfaces can get runny onto fabric. I'm still not a good screenprinter and I had several runny attempts before I thickened up my print paste.
I do like this little guy. I wanted him to be a little bigger to fill the space of the quilt a little better, so I think next time I will add borders or get an actual screen for screenprinting or a bigger embroidery hoop. (It is a cheap alternative)
Design and Materials: 1 hour
Execution: 3 hours
The product for this technique is called Mask Ease by Scratch-Art. This stuff is a vinyl mask that you apply to a prepared screen for screenprinting, and it acts as your resist so you can screen through it. I have some pictures of the process this time, to explain better.
I did not have a screen around, so I used some sheer cotton fabric and a wood embroidery hoop that cost me 99 cents. I wrapped the inner hoop with floral tape to make it sticky and pulled my fabric tight and put glue around the edges once I was sure it was taut. I then used the circle of the hoop to make my pattern.
I drew my cuttlefish onto the yellow vinyl surface. He's going to be reversed in print, so keep that in mind.
Then you cut the vinyl with an X-Acto knife to expose your lines. I followed the Mask Ease Instructions from here, adhering it to my screen and printing as usual.
One other note is that this needs to be used with good thick print paste or ink, as the large open surfaces can get runny onto fabric. I'm still not a good screenprinter and I had several runny attempts before I thickened up my print paste.
I do like this little guy. I wanted him to be a little bigger to fill the space of the quilt a little better, so I think next time I will add borders or get an actual screen for screenprinting or a bigger embroidery hoop. (It is a cheap alternative)
Tuesday, September 07, 2010
Technique of the Week #24 - Scratch-A-Print Screenprinting
Project Hours: 3 hours
Design and Materials: 1 hour
Execution: 2 hours
This is was one of two screen printing techniques I tried using a new product. This product is called Scratch-a-Print2, which I got from Dick Blick. The idea is that these very thin sheets of tissue paper are wax coated on one side, and you "scratch" your drawing into the front, rubbing the wax off onto some paper underneath and opening up the tissue for your paint to go through.
The size I bought meant that my pieces would be very small, and I could try several designs in one quilt.
I found this stuff super easy to use. It comes 10 to a pack, and when the directions say to "press hard" do indeed press hard and go over your lines twice to make sure they are opened up. I had to clean my screen and redraw the lines again, as my first ones were not open enough.
One thing that I did before I printed was to take clear packing tape and tape over the cardboard edges of the screens so that if I tried to wash the screen the cardboard would not disintegrate.
I was able to get a better result not be "screening", but by using a tissue and gently patting the screen ink through the tissue. Each one was immediately rinsed. These were the best of my attempts and I know I am not very good at screening.
As you can tell, my "year of the cephalopod" continues, and this is called "Cephalopod Party". There's a dumbo octopus, a regular octo, a cuttlefish and a squid. Yay! I do these designs because I don't have to do much thinking ahead of time, which saves time as I am trying to get myself caught up from my summer hiatus.
Monday, September 06, 2010
Technique of the Week #23 - Multi-part printing or Faux Screenprinting
Project Hours: 5 hours
Design and Materials: 1 hour
Execution: 4 hours
This week's technique is from this month's issue of Cloth Paper Scissors. Melanie Testa had hinted that this technique was something she helped test for a friend, and turns out that friend is her road-trip roommate from CREATE, Patricia Gaignat. I had the pleasure of meeting her at CREATE as well.
I am not going to give away how this was done because you should really get the magazine and give it a try, but I will say that I did this with sticky-backed fun foam and fabric paint. The fun foam was cut into my multi part print, and then mounted onto clear template plastic to help me align the pieces. I varied from the magazine only in using fabric paint on fabric (not paper) and the mounting on plastic.
This technique is so much easier than I had thought when Melly was showing her results way way back at IQA Chicago in April. I could not fathom how to line us the pieces, until I realized you could do so on acetate or plastic.
This little Octo is one of the first for me to have his legs cross over one another, something that made this project a little tougher.
I didn't do that good of a job registering my plates, but there's next time, and I have the plates forever. They wash up nicely. This would be great for ATCs.
Design and Materials: 1 hour
Execution: 4 hours
This week's technique is from this month's issue of Cloth Paper Scissors. Melanie Testa had hinted that this technique was something she helped test for a friend, and turns out that friend is her road-trip roommate from CREATE, Patricia Gaignat. I had the pleasure of meeting her at CREATE as well.
I am not going to give away how this was done because you should really get the magazine and give it a try, but I will say that I did this with sticky-backed fun foam and fabric paint. The fun foam was cut into my multi part print, and then mounted onto clear template plastic to help me align the pieces. I varied from the magazine only in using fabric paint on fabric (not paper) and the mounting on plastic.
This technique is so much easier than I had thought when Melly was showing her results way way back at IQA Chicago in April. I could not fathom how to line us the pieces, until I realized you could do so on acetate or plastic.
This little Octo is one of the first for me to have his legs cross over one another, something that made this project a little tougher.
I didn't do that good of a job registering my plates, but there's next time, and I have the plates forever. They wash up nicely. This would be great for ATCs.
Monday, August 30, 2010
Technique of the Week #22 - Thread Painting
Project Hours: 8 hours
Design and Materials: 2 hours
Execution: 6 hours
It was soooooo good to be back in the "saddle" again. I took this thread painting class from Elin Waterston at the Cloth Paper Scissors' art retreat called CREATE. I had one day, so I was limited in my choices of classes to take, and when I saw this one, I thought it wasn't going to be something I was interested in, but as usual, I was wrong. I also thought I "knew how to do that" so it wasn't going to hold my interest. Again, wrong!
Essentially thread painting is the layering on of thread free motion style to build up a subject. Like painting, except with thread. So the octopus here is only made with thread. The shading is done to give him some dimension.
The first thing Elin teaches you about thread painting is that there are no mistakes. And that sums up how our approach was: a free and casual approach.
We were encouraged to bring designs with us, but of course, I had been thinking for two weeks of a subject with no inspiration. When I got to class, I was going to make an octopus or a pomegranate. I chose to stay "on theme" for this year, with this little dude.
There are things I did "wrong" that worked itself out, like some puckering that ended up "quilting out" and the shadows of his bumps on his head were done in reverse, so they look like holes. OOPS. Oh well, he was an experiment.
A couple of things: this eats up thread. A LOT OF THREAD, so if you covet your expensive thread you may not want to try this. Second, Elin teaches you to look up, get up, get away every 20 minutes or so. This was critical, since I ended up hunched over the bed of the loaner Bernina 440 machine slaving away to cover my background. The class hours were from 9 am to 4 pm, and we sewed for about 4 of those hours. In that time I got the octopus above done and most of the machine quilting, and he isn't finished yet, so I will post a photo of the finished work later this week! I'll be adding a section of beads and an embroidered school of fish to complete him. Enjoy!
Design and Materials: 2 hours
Execution: 6 hours
It was soooooo good to be back in the "saddle" again. I took this thread painting class from Elin Waterston at the Cloth Paper Scissors' art retreat called CREATE. I had one day, so I was limited in my choices of classes to take, and when I saw this one, I thought it wasn't going to be something I was interested in, but as usual, I was wrong. I also thought I "knew how to do that" so it wasn't going to hold my interest. Again, wrong!
Essentially thread painting is the layering on of thread free motion style to build up a subject. Like painting, except with thread. So the octopus here is only made with thread. The shading is done to give him some dimension.
The first thing Elin teaches you about thread painting is that there are no mistakes. And that sums up how our approach was: a free and casual approach.
We were encouraged to bring designs with us, but of course, I had been thinking for two weeks of a subject with no inspiration. When I got to class, I was going to make an octopus or a pomegranate. I chose to stay "on theme" for this year, with this little dude.
There are things I did "wrong" that worked itself out, like some puckering that ended up "quilting out" and the shadows of his bumps on his head were done in reverse, so they look like holes. OOPS. Oh well, he was an experiment.
A couple of things: this eats up thread. A LOT OF THREAD, so if you covet your expensive thread you may not want to try this. Second, Elin teaches you to look up, get up, get away every 20 minutes or so. This was critical, since I ended up hunched over the bed of the loaner Bernina 440 machine slaving away to cover my background. The class hours were from 9 am to 4 pm, and we sewed for about 4 of those hours. In that time I got the octopus above done and most of the machine quilting, and he isn't finished yet, so I will post a photo of the finished work later this week! I'll be adding a section of beads and an embroidered school of fish to complete him. Enjoy!
Thursday, August 12, 2010
Technique of the Week #21 - Slow Cloth/Torn fabrics
Project hours: 7 hours
Design and materials: 1 hours
Execution: 6 hours
Before you get all excited that the Techniques are back, this is one that I have been working on this summer while it's been all crazy. I have about 3 more weeks before the summer of crazy is over, at which time, the Technique of the Week will resume! (yay!)
The Slow Cloth movement is one that I am trying hard to embrace, because the tenets of it speak to me as a quilt artist. It started out as a "joy in the process" thing, and moved to have about 10 basic principles.
At the same time I was reading about this movement, I also was inspired by an artist who had made works entirely of torn cloth. There's another artist with a similar style in the August/September issue of Quilting Arts (the current issue).
This was made with torn squares of gorgeous Cherrywood Dyes, and made most of it while I was on vacation in Europe this May. I focused on the process while making it, and enjoyed that each square would be uniquely stitched and hand fringed. This is a great thing for relaxation on vacation, and a way to get some handwork in.
Design and materials: 1 hours
Execution: 6 hours
Before you get all excited that the Techniques are back, this is one that I have been working on this summer while it's been all crazy. I have about 3 more weeks before the summer of crazy is over, at which time, the Technique of the Week will resume! (yay!)
The Slow Cloth movement is one that I am trying hard to embrace, because the tenets of it speak to me as a quilt artist. It started out as a "joy in the process" thing, and moved to have about 10 basic principles.
At the same time I was reading about this movement, I also was inspired by an artist who had made works entirely of torn cloth. There's another artist with a similar style in the August/September issue of Quilting Arts (the current issue).
This was made with torn squares of gorgeous Cherrywood Dyes, and made most of it while I was on vacation in Europe this May. I focused on the process while making it, and enjoyed that each square would be uniquely stitched and hand fringed. This is a great thing for relaxation on vacation, and a way to get some handwork in.
Monday, May 17, 2010
Technique of the Week # 20 - Notan Japanese Cut Quilt
Project hours: 2 hours
Design and materials: 1 hours
Execution: 1 hours
I learned about this awesome technique many moons ago on Jane Dunnewold's website. She has a great tutorial here about the art of Notan, or light and dark design principles usually demostrated with papercutting. This isn't about Scherenschnitte, German scissor cutting, though they can be similar. The voids you leave in the paper, flipped outwards are an extension of the design in this technique. Be sure to check out Jane's website for more info than I could possibly explain here.
Papercutting is a great design source for quilting, and I was stumped at first to come up with a design that I wanted to actually cut from fabric. This is one instance where my "Year of the Cephalopod" comes in handy, it's an easy design resource. I was able to make this octopus design quickly, and I was happy with the results. Most Notan is done in black and white for easy contrast, but to take the technique one step further I decided to use grey and pink.
Sorry it's not quilted yet, it's been a hectic week!
Design and materials: 1 hours
Execution: 1 hours
I learned about this awesome technique many moons ago on Jane Dunnewold's website. She has a great tutorial here about the art of Notan, or light and dark design principles usually demostrated with papercutting. This isn't about Scherenschnitte, German scissor cutting, though they can be similar. The voids you leave in the paper, flipped outwards are an extension of the design in this technique. Be sure to check out Jane's website for more info than I could possibly explain here.
Papercutting is a great design source for quilting, and I was stumped at first to come up with a design that I wanted to actually cut from fabric. This is one instance where my "Year of the Cephalopod" comes in handy, it's an easy design resource. I was able to make this octopus design quickly, and I was happy with the results. Most Notan is done in black and white for easy contrast, but to take the technique one step further I decided to use grey and pink.
Sorry it's not quilted yet, it's been a hectic week!
Monday, May 10, 2010
Technique of the Week #19 - Shading with MistyFuse
Project hours: 2 hoursDesign and materials: 1 hours
Execution: 1 hours
MistyFuse is a paperless fusible web that comes in white, black, and ultraviolet. Iris, the wonderful woman at MistyFuse, had some that wasn't black enough, but was perfect for what I want it for, so I bought a whole bolt.
The pear is layers of MistyFuse to create the "drawing" of the fruit. No tulle is used. How I did this was to draw out a design onto paper, including marking where I wanted the shading of the layers to lay. I laid a small piece of MistyFuse down over the drawing, and holding the MistyFuse with one hand, I snipped away the excess with the other. I did this for each layer, and fused it down with my Goddess pressing sheet as I cut them. It was really neat to see the design take shape. More complicated designs would take longer, but I can see using this for shading still lifes, people, and much more. I especially like how it looks hand drawn.
Subscribe to:
Posts (Atom)